
How to Find Accurate Shirt Sizing: A Real Fit Guide
Table of Contents
- Why Your Shirt Size Guesses Keep Failing
- How to Measure Chest Size for Shirts: The 30-Second Method
- Neck and Sleeve Measurements for a Complete Fit
- How to Measure a T-Shirt for Online Shopping
- Decoding the Difference Between Slim Fit and Regular Fit
- Fabric Shrinkage and Sizing Discrepancies Across Brands
- Common Measuring Mistakes That Ruin Your Fit
- Match Your Measurements to the Size Chart
- Frequently Asked Questions
Last Updated: September 7, 2026
Finding clothes that fit right without trying them on first is one of the most frustrating parts of online shopping. When that shirt arrives and the shoulders sit wrong or the hem rides up, the problem usually isn't the brand. It's that your guess about your size was based on a number you wear in another label, not on your actual body. Accurate shirt sizing starts with a tape measure, not a size chart guess, and this guide from MyRadTee walks you through the simple process that takes about two minutes.
Once you know your true chest, neck, and sleeve numbers, you can order from almost any brand with confidence, including figuring out how to measure a t-shirt for online shopping so the fit matches what you expect. Below, we'll show you exactly how to take those measurements and what to do with them.
Why Your Shirt Size Guesses Keep Failing
Most people buy shirts based on the size they wore in high school or the size that fits them in one particular brand. That approach breaks down because there is no universal standard for sizing across manufacturers. A size medium from one company can match a large from another.
The fix is to stop thinking in letters and start thinking in inches and centimeters. Body measurements are the only reliable bridge between you and a size chart. When you know your chest circumference and torso length, you can compare those numbers directly against the garment dimensions listed on any product page.
How to Measure Chest Size for Shirts: The 30-Second Method
Measuring your chest is the single most important step for accurate shirt sizing, and it takes less than half a minute with a flexible measuring tape. Stand naturally with your arms relaxed at your sides, then wrap the tape around the fullest part of your chest, which for most people sits right at the nipple line. Keep the tape parallel to the floor and snug against your body without compressing the skin, then exhale normally and take the reading.
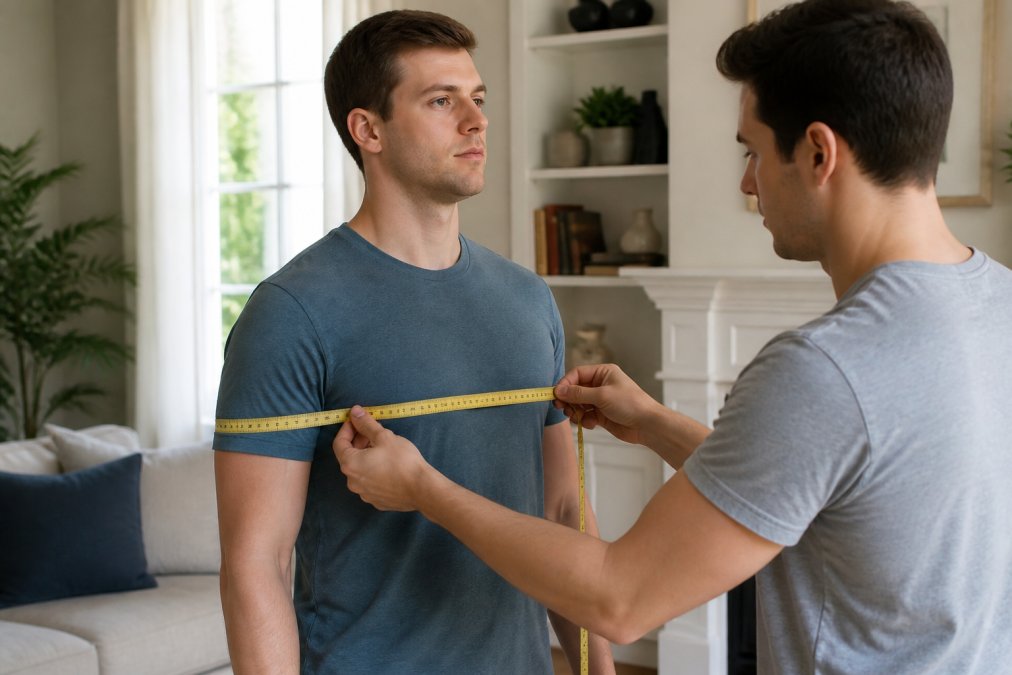
The number you get is your chest circumference, and it should be taken against bare skin or a thin t-shirt, never over a bulky sweater. Write it down and round to the nearest half inch. This measurement forms the baseline for every size chart you will consult.
Tape Placement for an Accurate Reading
Getting an accurate reading depends entirely on where you place the tape. Too high and you catch your armpits, which adds inches that do not reflect how a shirt actually fits. Too low and you measure your waistline instead of your chest.
The correct spot is the fullest part of your chest, which usually aligns with the middle of your sternum. The tape should sit flat across your back and meet evenly in the front without twisting.
Neck and Sleeve Measurements for a Complete Fit
Chest size alone gets you close, but neck and sleeve measurements turn a decent fit into a tailored one. For collared shirts, the neck measurement determines whether the collar feels comfortable or chokes you. Place the tape around your neck just below the larynx, keeping one finger between the tape and your skin for comfort.
Sleeve length is measured from the center of your back at the base of your neck, across the shoulder, and down to your wrist bone. This is a two-person job for the most accurate result, because your arm needs to hang naturally while someone else runs the tape.
How to Measure a T-Shirt for Online Shopping
When you are shopping for a t-shirt rather than a dress shirt, measuring an existing shirt that fits you well is often more useful than measuring your body. Lay the shirt flat on a table, smooth out any wrinkles, and measure across the chest from armpit to armpit. Double that number to get the full chest measurement, then compare it directly to the garment dimensions on the product page.
You should also measure the shirt length from the top of the shoulder seam down to the hem, since torso length varies significantly between brands. This flat-surface method works because it measures the actual garment construction rather than your body, which accounts for how much ease the designer built into the cut.
Decoding the Difference Between Slim Fit and Regular Fit
The difference between slim fit and regular fit comes down to how much extra room the shirt has through the chest and waist. A slim fit shirt is cut closer to the body, with less fabric through the middle and often a slightly shorter hem (the American Academy of Dermatology). A regular fit shirt offers more room through the chest, shoulders, and torso.
But the real question is not which fit is "better", it is which fit matches your specific body shape. Generic height/weight calculators fail here because they do not account for how your weight is distributed. Here is how to use your actual measurements to decide:
- Athletic build (broad shoulders, narrow waist): If your chest measures 42 inches but your waist is 34 inches, the difference is 8 inches. A slim fit shirt cut for a 42-inch chest will likely have a waist that is only 2-3 inches smaller, leaving you with excess fabric pooling at your midsection. A regular fit will be even worse. Instead, look for shirts labeled "athletic fit" or "tapered fit," which add room in the shoulders and chest while keeping the waist closer to your true measurement. If those are not available, size to your chest and plan to have the waist taken in by a tailor, a $15 alteration is cheaper than a shirt that bunches.
- Long torso (tall, proportionally longer upper body): Standard shirt lengths are designed for a 30-32 inch torso. If your torso measures 34 inches from the base of your neck to your natural waist, a regular fit shirt will ride up when you sit or raise your arms. Look for brands that offer "tall" sizing, which typically adds 2-3 inches to the hem length without changing the chest or shoulder dimensions. Measuring your torso length directly, from the prominent bone at the base of your neck down to your waistline, is the only way to know if you need this.
- Broad shoulders (shoulder width exceeds chest proportion): If your shoulder-to-shoulder measurement is 19 inches or more on a 40-inch chest, standard shirts will pull across the back when you move your arms forward. The fix is not a larger size (which adds chest room you do not need) but a cut with a wider shoulder yoke. Check the product page for the shoulder width measurement, if it is not listed, contact customer service. A shirt with a 17.5-inch shoulder on a 40-inch chest will restrict movement, while an 18.5-inch shoulder on the same chest will allow full range of motion.
- Carrying weight in the midsection (chest-to-waist difference under 4 inches): If your chest and waist measurements are within 4 inches of each other, a slim fit will likely drape well without pulling at the buttons. If the difference is larger, a regular fit prevents the shirt from pulling or gaping at the buttons. Fit preference also plays a role, so try both cuts if you are between body shape variations and see which one matches your comfort level.
The most reliable approach is to measure an existing shirt that fits you well in the cut you prefer, then compare those garment dimensions to the product page. This bypasses the guesswork of fit labels entirely, because you are matching actual construction numbers rather than relying on a brand's interpretation of "slim" or "regular."
Fabric Shrinkage and Sizing Discrepancies Across Brands
Fabric shrinkage is the hidden culprit behind many ruined fits, and it explains why a shirt that fits perfectly fresh out of the package can be noticeably tighter after a few washes. Natural fibers like cotton absorb water during washing, causing the yarns to swell and the fabric structure to relax, which then tightens as the garment dries (peer-reviewed research). The effect is most pronounced in the first wash cycle.
Here is what actually happens with common shirt materials, so you can predict shrinkage before you buy:
- 100% cotton (non-pre-shrunk): Expect up to 5% shrinkage in length and 3% in width on a warm wash and high-heat dry. A shirt with a 28-inch length can lose over an inch, which pulls the hem up noticeably.
- Cotton-polyester blends (e.g., 60/40): Polyester fibers do not absorb water the way cotton does, so the blend shrinks far less, typically 1-2% at most. This is why many athletic and everyday tees use a cotton-poly mix.
- Pre-shrunk cotton (e.g., garment-washed or sanforized): The manufacturer has already run the fabric through a controlled shrinkage process during production. Residual shrinkage is usually under 1%, meaning the fit you try on is essentially the fit you keep.
- Synthetics (polyester, nylon, spandex): These fibers are essentially shrink-resistant. The main risk is heat damage from a hot dryer, which can warp the fabric or break down elastic fibers over time, but dimensional shrinkage is minimal.
Brands differ in how they account for this. Some manufacturers pre-shrink their fabric during garment construction, while others assume you will air dry or use low heat. If you typically machine dry your shirts, look for brands that state their fabric is pre-shrunk, or buy a half size up to leave room for natural shrinkage.
A practical rule of thumb: if the product page does not explicitly say "pre-shrunk" or "garment-washed," assume the shirt will shrink. In that case, compare your body measurements against the size chart with a 2-3% buffer in mind, and size up if you are on the boundary.
This is also where the Federal Trade Commission's guidance on textile labeling matters: the FTC requires care labels to list fiber content and washing instructions, but it does not standardize garment sizes. That means the shrinkage behavior of a shirt is tied directly to the fiber percentages on that label, not to the brand's size letter.
Common Measuring Mistakes That Ruin Your Fit
Several small errors during measurement lead to outsized fit problems. The most common mistake is pulling the measuring tape too tight, which compresses your body and produces a reading that is smaller than your actual size. The tape should sit snugly but never dig into your skin.
Another frequent error is measuring over bulky clothing, which adds phantom inches to your numbers. Always measure against bare skin or a thin layer, and keep your posture natural. Finally, do not mix units between your measurements and the size chart. If the chart lists garment dimensions in inches, measure in inches, not centimeters.
| Mistake | Fix | Impact on Fit |
|---|---|---|
| Tape pulled too tight | Keep tape snug, not compressed | Shirt feels restrictive |
| Measuring over bulky layers | Use bare skin or thin t-shirt | Adds phantom inches |
| Mixing inches and centimeters | Match the size chart units | Off by full size |
| Wrong tape placement | Measure fullest part of chest | Shoulder pull or gaping |
Match Your Measurements to the Size Chart
Once you have your chest, neck, and sleeve numbers, the final step is matching them to the brand's size chart, and this is where accurate shirt sizing pays off. Find the row where your chest measurement falls, then check the corresponding garment dimensions rather than just the letter size.
When you land on a boundary, your fit preference decides the winner. Choose the larger size if you want a relaxed fit that layers well, or the smaller size if you prefer a closer cut. The Federal Trade Commission's guidance on textile labeling notes that clothing sizes are not standardized across the industry, which is exactly why checking each brand's chart matters. Many online retailers, including MyRadTee, provide size charts on every product page, and comparing your body measurements against those garment dimensions is the most reliable way to get a shirt that fits the first time.
Finding the right fit does not require buying three sizes and returning two. With a tape measure and two minutes, you can get accurate shirt sizing every time by knowing your true chest, neck, and sleeve measurements and comparing them against real garment dimensions. Many online retailers, including MyRadTee, provide size charts on every product page, and comparing your body measurements against those garment dimensions is the most reliable way to get a shirt that fits the first time. Get started with MyRadTee and find a shirt that fits like it was made for you.
Frequently Asked Questions
How do I know my exact shirt size between different brands?
Measure your chest, neck, and sleeve length with a soft measuring tape, then compare those numbers to each brand's specific size chart. Don't rely on your usual letter size. A size medium in one brand may measure 40 inches in the chest, while another brand's medium is 42 inches. Your body measurements don't change, so the chart does the work of translating them into the right size for that specific garment.
What is the difference between slim fit and regular fit shirts?
Slim fit shirts cut closer to the body with a narrower chest and waist, while regular fit leaves extra room through the torso for comfortable movement. Check the garment measurements rather than just the label. If your chest measures 40 inches, a slim fit medium might work, but a regular fit medium could feel too loose. Your fit preference determines which one looks and feels right on you.
Will my shirt shrink after washing?
Cotton shirts can shrink 3-5% in the first wash, which is why measuring a brand new shirt can mislead you. Look for pre-shrunk fabrics or account for potential shrinkage when choosing between two sizes. If your chest measurement falls right at the top of a size range, consider sizing up for a relaxed fit that stays comfortable after washing. Always follow the care label to minimize shrinkage.